LinkedIn groups are one of the most popular communities on social media and it is the most powerful tool of LinkedIn which helps you reach more like-minded people and build relationships for your business.
Well, if I’ll have to define LinkedIn groups, I’ll define it this way-
LinkedIn Group is place for professionals in the same industry or with similar interests to share content, find answers, post and view jobs, make business contacts, and establish themselves as industry experts.
Now let’s begin from the very basic stage of creating LinkedIn group. Well, if you’ve already created the group, you can scroll down a bit.
To create a LinkedIn group, head over to your LinkedIn homepage and follow these steps:

- Click on the Work icon in the top right of your homepage and then select Groups from the dropdown.
- Click the “My Groups” tab at the top of the page
- Click the “Create group” button on the left rail.
- Fill in the requested information.
- Click the Save Changes button to create your group.
So now your LinkedIn group is ready, and can invite your friends to join your group.
Okay! Wait a minute.
Just look at your group and consider yourself, would you join this group?
Well, I don’t know about you, but I’d definitely not join that, because the group has nothing that can pique my excitement to become member of the group.
So, first of all you need to make your Group so exciting and thriving that people would love to join and partake actively in the discussions.
Now, I’m going to share you the best practices for creating the best LinkedIn group in your niche.
1. Create a group description with relevant keywords.
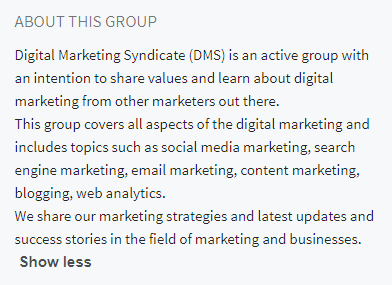
Including relevant keywords in your group description that your target audience uses to describe your niche will make it indexed in the LinkedIn group search results for your category.

Also make sure you describe what your group is about and what is the main intention behind creating the group so that it arouse the interest of LinkedIn users to join your group to learn and share values.
To edit or add description of your group,
- Click the “Manage” tab on the top right corner of your group page.
- Select the option “Group details” from the left-hand sidebar under “Manage group”.
- Now enter the description of your group in the text-box under “Description”.
- Click “Save Changes” to save.
2. Create a set of group rules.
Every community whether it is digital community or real life community should have a set of rules to regulate community, to enforce the rights, to solve conflicts and to make decisions actions against the defaulters.
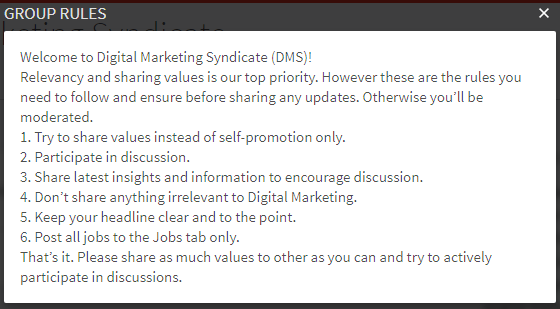
Similarly, you should have a set of some basic rules for your LinkedIn group and enforce it in making decisions for member approval and moderation of posts.

Rules and its enforcement encourage people to join your community as it indicates that they will get quality contents and opportunities to build healthy relationships with like-minded professionals in your group.
To add group rules,
- Select the option “Group details” from the left-hand sidebar under “Manage group”.
- Now enter the rules for your group in the text-box under “Group rules”.
- Click “Save Changes” to save.
However it is an optional field, but I think it is the most important field to include in your group as it will ensure people that there’s a true value and intention behind the creation of the group.
3. Create message templates.
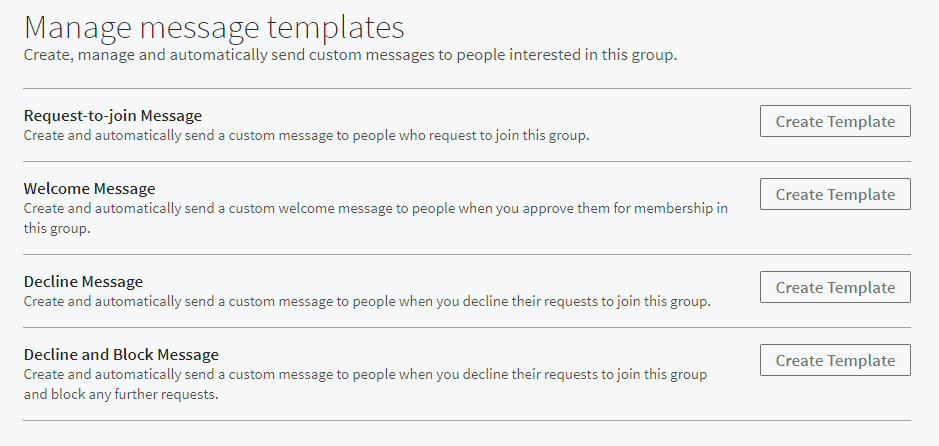
LinkedIn offers you to create message templates and send automatically a custom message to people interested to join your group.

You can create four different templates to send at different stages of people trying to join your group. These are:
- Request-to-join Message: In this message template, you have to deal with people who request to join your group. Make sure your message in this template assures the request sender that his/her request would be approved soon. Also provide them some additional values by sharing more information about your group and the people behind it.
- Welcome Message: In this template, create a message that will be automatically sent to people when you approve their request. In this message try to be grateful to them for joining your group and also encourage them to actively partake in discussions.
- Decline Message: In this template, create a message that will be automatically sent to the people when you decline their request. In this message tell them the possible reason behind their rejection and also share them tips to improve their profile as per the requirement and send the request again.
- Decline and Block Message: In this template, create a message for those peoples whose request will be declined and blocked from any further request. This mostly happen with spam and irrelevant accounts who has nothing to do with your group. So in this message tell them the possible reasons for declining and blocking them from any further requests.
Now to create message templates follow these four simple steps:
- Select the option “Templates” from the left-hand sidebar under “Manage group”.
- Now click on the tab which says “Create Template”.
- Enter subject, message and enable auto-send to automatically send message.
- Click “Save Template” to create the Template.
Similarly, create rest of the message templates and while doing so, make sure you’re sharing as much details about your group as possible.
4. Turn your group into public group.
When you start your group on LinkedIn, your group will be public by default. But I think you should be aware about it and its benefits.
In LinkedIn public group means, any LinkedIn user can request to join your group but they need approval from the core team of the group to become its member.
I’m very clear with regards to who can be accepted into my LinkedIn group – Digital Marketing Syndicate (DMS) and it is well defined in the group description and rules. Although, it does takes time to go through the approval or decline of the requests, but it’s well worth for the group members.
To make your group public,
- Select the option “Group details” from the left-hand sidebar under Manage group.
- Select the check box which says “Standard Group” under Group Membership.
- Click “Save Changes” to make it publicly available.
When you make your group publicly available, members can invite other members and the group will be visible on search results. And thus plays a significant role in boosting the membership.
5. Moderate your group.
If you want to keep your group filled with quality contents and healthy discussions, you’ll have to not only manage the membership but also closely monitor the group’s activity.
You’ve to make sure that there are no self-promotional posts and off-topic contents from the marketers who see your group as an advertising spot for their products and services.
If you find any such spam contents, you need to moderate that content and the member from your group. However it depends on group management to decide the level of moderation they want in group conversations, but LinkedIn also supports auto-moderation according to which the posts go through moderation if:
- The same message promoted in multiple groups at once. This is because the same information is not typically relevant to numerous groups.
- Conversation promotes a site or other sites. For example, it contains a URL to a commercial site that tries to sell a product or service.
- Post has inappropriate words or content and was not professionally oriented.
In this way, your group will be free from spam and marketers and there will be a healthy environment for your group members to engage and participate in discussions.
6. Promote your group to build membership.
As every essential settings and details has been added to your group, now time has come to invite members and build membership.
There are several ways to promote your group, but you must begin with inviting your appropriate LinkedIn connections to join your group if they fit in the basic parameters.
As there will be some activities going on in your group, you can head over to other promotional strategies to build membership as people don’t like to be a part of community where members don’t partake in discussions.
Now, as the group owner, you have to be the most active member of your group. So make sure you’re regularly sharing latest industry-relevant news and updates. Also post interesting questions and discussion topics to keep your members active and engaged.
A LinkedIn group is one of the best places to learn and share knowledge with active members and to build relationships with top professional of industry for career and business purpose.
What are your thoughts about LinkedIn group? Do you have any suggestion for us? Please do let us know via comment.
